Ingredients
-
Filling
-
2 tablespoons Cornstarch
-
2 tablespoons Water
-
8 cups peeled and thinly sliced Granny Smith Apples
-
1 tablespoon freshly squeezed Lemon Juice
-
¾ cup packed Brown Sugar
-
1 teaspoon ground Cinnamon
-
½ teaspoon ground Nutmeg
-
½ teaspoon Sea Salt
-
Pastry
-
2 cups all-purpose Flour
-
1 tablespoon Granulated Sugar
-
½ teaspoon Sea Salt
-
1 cup cold Vegan Butter
-
½ cup ice-cold Water
Directions
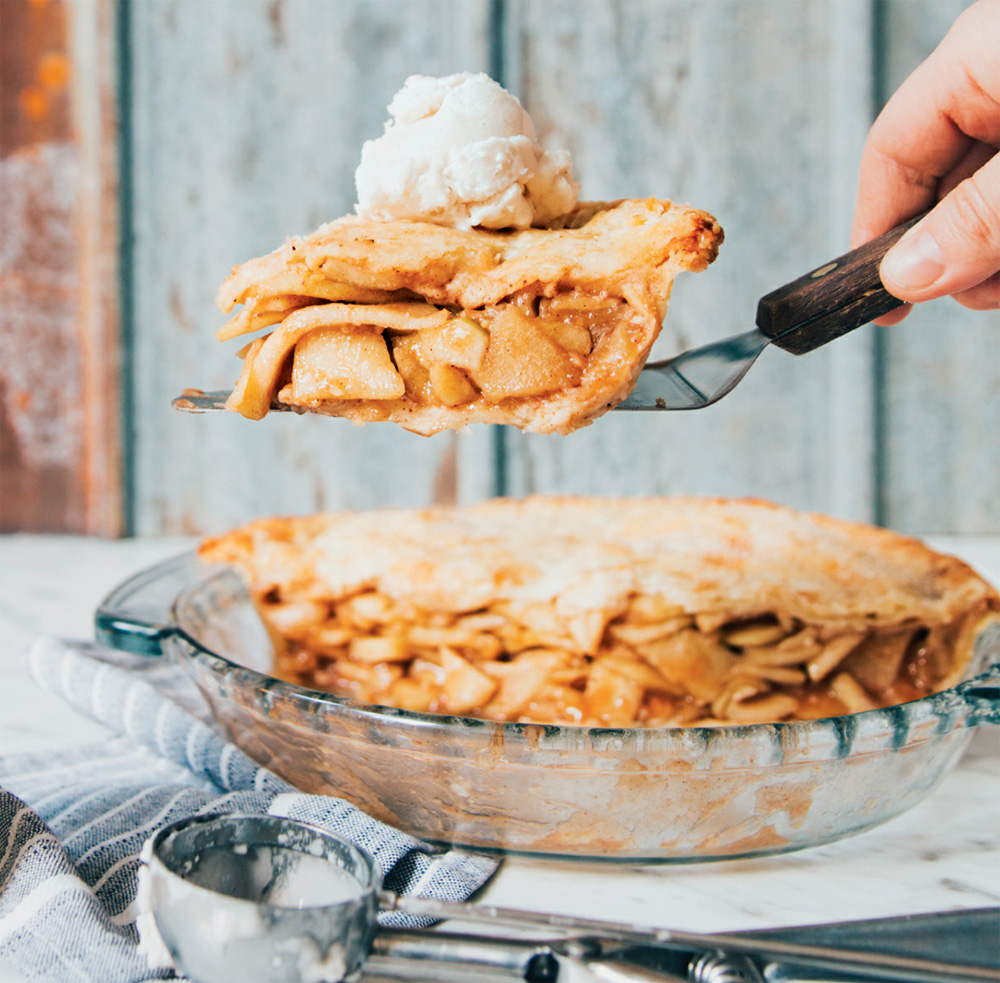
Baking a pie is like beating the whole video game. You didn’t think you could do it, and your hands hurt, but with enough hours of game time it was, like, the biggest achievement of your life. Luckily for you, I’ve done the legwork and will walk you through every step of the journey with secret tips along the way. Let’s up the ante and bake some pie!
Steps
|
1
Done
|
To make the filling, combine the cornstarch and water into a slurry in a small bowl and set aside. Toss the sliced apples with the lemon juice in a bowl to prevent them from browning. In a large saucepan over medium heat, combine the sugar, cinnamon, nutmeg, salt, and cornstarch slurry. Toss in the apples and stir until well coated. Heat the mixture, stirring constantly, to cook the apples and create a thick syrup, 8 to 10 minutes. Most of the water should evaporate, and the filling shouldn’t be too runny. Allow the filling to cool. |
|
2
Done
|
To make the pastry, combine the flour, sugar, and salt in a large bowl. Cut in the cubed butter with a pastry blender until a crumblike texture is formed with pea-size pieces of butter throughout. Create a well in the center of the mixture and pour in the water. Fold the pastry together a few times with a spatula until just mixed but still crumbly. Do not overmix! |
|
3
Done
|
Portion half of the pastry on a large piece of plastic wrap. Lift the sides of the plastic over the pastry to bring it together and gently form a ball. Finish wrapping the pastry in the plastic and gently flatten into a thick disk. Do the same with the other half. |
|
4
Done
|
Refrigerate the pastry for at least 15 minutes before rolling out. You can also leave it up to 24 hours in the fridge, but it may need to sit at room temperature for 5 minutes to soften slightly before rolling out. |
|
5
Done
|
Have ready a 9-inch pie pan. Flour the work surface, your hands, and a rolling pin and roll out one portion of the pastry to a round ⅛ to 3/16 inch thick, stopping every couple of rolls to make sure the pastry isn’t sticking. Gently lift the pastry and lightly flour again underneath as you go. |
|
6
Done
|
The pastry should be at least 3 inches wider than your pie pan all around. Roll the pastry over the floured rolling pin, transfer it to the pie pan, and roll it over the top of the pan. Gently press the pastry into the bottom and sides of the pan. Trim any excess, leaving at least a ½-inch overhang for shrinkage when you bake. Prick the bottom and sides of the pastry with a fork. Freeze for 15 minutes. |
|
7
Done
|
To help prevent a soggy bottom crust, you will prebake the pastry. Preheat the oven to 425°F. Cut a square of parchment paper larger than the pie pan and place it in the pan so it covers the bottom and sides of the pastry. Fill about halfway to the top edge of the pan with pie weights or any kind of dried bean. Bake for 12 minutes. Remove the parchment paper and pie weights and bake for another 2 to 3 minutes until the edges are just turning golden brown. Remove the crust from the oven, leaving it in the pie pan to cool on a wire rack. Only once the bottom crust is cooled should you roll out the pastry for the top crust. Gently trim any excess from the edge of the prebaked crust with scissors so it meets the edge of the pan. |
|
8
Done
|
Flour the work surface, your hands, and the rolling pin and roll out the remaining pastry to a round ⅛ to 3/16 inch thick, stopping every couple of rolls to make sure the pastry isn’t sticking. Gently lift the pastry and lightly flour underneath as you go. |
|
9
Done
|
Fill the prebaked bottom crust with the cooled apple filling in an even layer. Roll the pastry over the rolling pin, transfer it over the filling, and roll over top. Trim any excess overhang where necessary. Fold the pastry over and gently tuck under the bottom edge of the bottom crust all the way around the edge of the pie pan. Use the tines of a fork to press the top into bottom crust as an extra seal. Make a few slits in the center of the top to vent the pie while baking. |
|
10
Done
|
Bake for 25 to 30 minutes. At this point, you’ll likely notice that the edges are done and golden brown but the top is not. Cut a square of aluminum foil slightly wider than the pie. Cut out a circle in the center that is roughly the circumference of the pie inside the crust edge and discard. Place the foil cover on the pie to protect the edges and continue baking for 10 to 15 minutes. If at any point you need to cover the entire top with foil, do so but allow the pie to bake at least 40 to 45 minutes total. |
|
11
Done
|
Remove the pie from the oven and remove the foil. Let it rest in the pie pan on a wire rack for at least 4 to 6 hours before slicing. If you like a real juicy pie, go ahead and serve it after 1 to 2 hours but the slices may not hold together nicely. The pie is even better when left to sit overnight at room temperature. Once the pie has cooled, you can cover it loosely with foil. Refrigerate any leftover pie and warm up leftovers before serving in a 350°F oven with a piece of foil loosely on top. |

